Create a plugin
Configure your Development Environment
Before getting started, you need to have Node.js and npm (Node's package manager) installed. You can download them from the official Node.js website.
Note: This guide is based on Angular 18 and covers all features available in this version. However, for later versions of Angular, most of the information contained should be applicable, taking into account possible variations introduced in more recent versions. It is recommended to review the official release notes to ensure full compatibility with the version used.
Install Angular CLI
Angular CLI is a tool that helps you create and manage Angular projects. Open your terminal or command line and install it with the following command:
npm install -g @angular/cli@18
Create a New Project
Once Angular CLI is installed, you can create a new project with this command:
ng new your-project-name --routing=false --style=css --view-encapsulation=ShadowDom
It will ask us the following question:
? Do you want to enable Server-Side Rendering (SSR) and Static Site Generation (SSG/Prerendering)? (y/N)
We will answer no, and wait for all dependencies to be installed.
Run your Application
To see your application in action, navigate to the project directory and run:
cd your-project-name
ng serve
This will start a local server. Open your browser and go to http://localhost:4200 to see your new Angular application.
Add Shell dependency
To add the "@uxland/primary-shell" dependency to your project, run the following command at the root of your project:
npm install @uxland/primary-shell
Initialize the Shell
When initializing the project, we have the main.ts file this way:
import { bootstrapApplication } from '@angular/platform-browser';
import { appConfig } from './app/app.config';
import { AppComponent } from './app/app.component';

bootstrapApplication(AppComponent, appConfig)
  .catch((err) => console.error(err));
For shell initialization, we will replace the main.ts file we saw above with the following code:
import { initializeShell } from "@uxland/primary-shell";
import "@uxland/primary-shell/dist/style.css"; // Add global shell and Design System styles

// Create an HTML container where we will inject the shell later
const createAndAppendSandboxApp = () => {
    const app = document.createElement("sandbox-app");
    document.body.appendChild(app);
    const sandbox = document.querySelector("sandbox-app");
    return sandbox as HTMLElement;
}
// Initialize the sandbox and the application
const initializeSandboxApp = (sandbox: HTMLElement) => {
    try {
        if (sandbox) {
            initializeShell(sandbox);
        }
    }
    catch (error) {
        console.warn(error);
    }
 }

const sandbox = createAndAppendSandboxApp();
initializeSandboxApp(sandbox);
Remove the "app-root" container and add the basic shell styles to the index.html:
<!doctype html>
<html lang="en">
<head>
  <meta charset="utf-8">
  <title>Angular plugin demo</title>
  <base href="/">
  <meta name="viewport" content="width=device-width, initial-scale=1">
  <link rel="icon" type="image/x-icon" href="favicon.ico">
</head>

<body>

</body>

<custom-style>
  <style>
    body {
      margin: 0;
      overflow: hidden;
      font-size: 14px;
      background-color: #f5f6fa;
      font-family: 'Roboto', sans-serif;
      pointer-events: auto !important;
      width: 100%;
      height: 100%;
    }
    html {
      font-size: 14px;
      overflow: hidden;
      font-family: 'Roboto', sans-serif;
      width: 100%;
      height: 100%;
    }
  </style>
</custom-style>
</html>
The Primary shell should be rendered in the browser.
Generate plugin project
Harmonix plugins with Angular will really be Angular libraries. We will use Angular CLI to generate it.
ng generate library my-plugin
This should generate a new folder with the my-plugin code in the projects folder.
Remove template files
Template files must be removed. We delete the lib folder and the public-api file
Declare plugin entry file
A file must be declared where the necessary functions to declare a plugin are implemented. By convention the file is named plugin.ts. Then we will create the file projects/my-plugin/src/plugin.ts.
import "@angular/compiler";
import { PrimariaApi } from "@uxland/primary-shell";

export const initialize = (api: PrimariaApi) => {
    console.log(`Plugin ${api.pluginInfo.pluginId} initialized`);
    return Promise.resolve();
};

export const dispose = (api: PrimariaApi) => {
    console.log(`Plugin ${api.pluginInfo.pluginId} disposed`);
    return Promise.resolve();
};
It is important to add the import "@angular/compiler"; to be able to compile at runtime in the application.
In the ng-package.json file the library entry must be modified to entryFile and remove the dest field.
{
  "$schema": "../../node_modules/ng-packagr/ng-package.schema.json",
  "lib": {
    "entryFile": "src/plugin.ts"
  }
}
Import plugins in the sandbox
Declare the plugin import definition
We will create a file with the plugin definitions with their importers.
Here we will indicate the plugin id and its loading method.
For this, we will create the plugins.ts file in the src folder of the root:
import { PluginDefinition, Plugin } from "@uxland/primary-shell";

const importer: () => Promise<Plugin> = () => import("../projects/my-plugin/src/plugin") as any;
export const plugins: PluginDefinition[] = [{ pluginId: "angular-plugin", importer: importer}]
This will import the plugin via the entry file (projects/my-plugins/src/plugin) created previously.
Execute plugin bootstrap
We will call the plugin bootstrap function.
We will do it by calling the bootstrapPlugins function in main.ts, passing as parameter the import definitions (src/plugins.ts).
import { bootstrapPlugins, initializeShell } from "@uxland/primary-shell";
import { plugins } from "./plugins";
//...

const initializeSandboxApp = (sandbox: HTMLElement) => {
    try {
        if (sandbox) {
            initializeShell(sandbox);
            bootstrapPlugins(plugins); // Call the initialization function of all plugins
        }
    }
    catch (error) {
        console.warn(error);
    }
}

//...
Now we should see the console log once the plugin has loaded.

Inject views
Now that we know the plugin is initialized correctly, we will create a component and inject it into the main region using the regionManager that the api provides us.
Create view:
Create component
Create a component with Angular CLI
ng generate component MainView --project my-plugin --view-encapsulation ShadowDom
This will generate an Angular component, with the view encapsulated in a ShadowDom, as indicated.
Convert to view
A folder called views will be created, and we will move the main-view component to the views folder.
Create Angular application:
Unlike other frameworks like Lit, React... Angular requires an application instance, we will create the instance in the plugin.ts
import { createApplication } from "@angular/platform-browser"; // Add this import
import { PrimariaApi } from "@uxland/primary-shell";

export const initialize = (api: PrimariaApi) => {
    createApplication().then(() => console.log("Angular application created")); // Add this line
    console.log(`Plugin ${api.pluginInfo.pluginId} initialized`);

    return Promise.resolve();
};
//...
Create view factory:
We will create a view factory, to be able to register the main view. We will create a factory.ts file in the main-view view folder where we will declare the factory:
import { ApplicationRef, NgZone, Type } from "@angular/core";
import { MainViewComponent } from "./main-view.component";

const viewAngularFactory = <C>(app: ApplicationRef, component: Type<C>): () => Promise<HTMLElement> => () => {
    const host = document.createElement("host-component");
    app.injector.get(NgZone).run(() => app.bootstrap(component, host));
    return Promise.resolve(host);
  }

  export const viewFactory = (app:ApplicationRef)  => viewAngularFactory(app, MainViewComponent);
Inject the view to the main region
Then, on one hand we will register a view to the main region and on the other hand we will do the same to the navigation region.
To do this, we will use the regionManager that the api provides us.
We will use the registerMainView method of the regionManager passing it the view factory.
We will also change the dispose function so it removes the view when the plugin is deactivated. To do this we will access the shell regions that the api gives us and use the main region. As the second argument we will pass the id of the view we want to remove. Since we will want to remove the view registered with the registerMainView function, we will pass it that same id:
import { createApplication } from "@angular/platform-browser";
import { PrimariaApi } from "@uxland/primary-shell";
import { viewFactory } from "./views/main-view/factory";

export const initialize = (api: PrimariaApi) => {
    createApplication().then((app) => {
        api.regionManager.registerMainView({
          id: "plugin-main-view", // Here we declare the view id
          factory: viewFactory(app),
        }); //Register the view to the main region with the declared factory
      });
    return Promise.resolve();
};

export const dispose = (api: PrimariaApi) => {
  const main = api.regionManager.regions.shell.main;
  api.regionManager.removeView(main, "plugin-main-view"); // Here we use the id of the main view we want to remove
  return Promise.resolve();
}
Other view injection examples: navigation menu
To add a plugin view in the side navigation menu we will use the registerView method of the regionManager. In this case, we will pass the factory an instance of the PrimariaNavItem class imported from the shell (@uxland/primary-shell), at the same time, we will pass it a configuration object that will have the "icon" property with the icon literal to display, "label" with the title that will be displayed in the menu and "callbackFn" with the callback that will activate the view registered in main when clicking the menu item:
//...
import { PrimariaApi, PrimariaNavItem } from "@uxland/primary-shell";

export const initialize = (api: PrimariaApi) => {
  //...
    const navigationMenu = api.regionManager.regions.shell.navigationMenu;
    api.regionManager.registerView(navigationMenu,{
            id: "plugin-navigation-menu",
            factory: () => {
              const menuItem = new PrimariaNavItem({
                icon: "bolt",
                label: "Angular plugin",
                callbackFn: () => {
                  api.regionManager.activateMainView("plugin-main-view");
                },
              });
              return Promise.resolve(menuItem);
            },
          });
    //...
};

//...
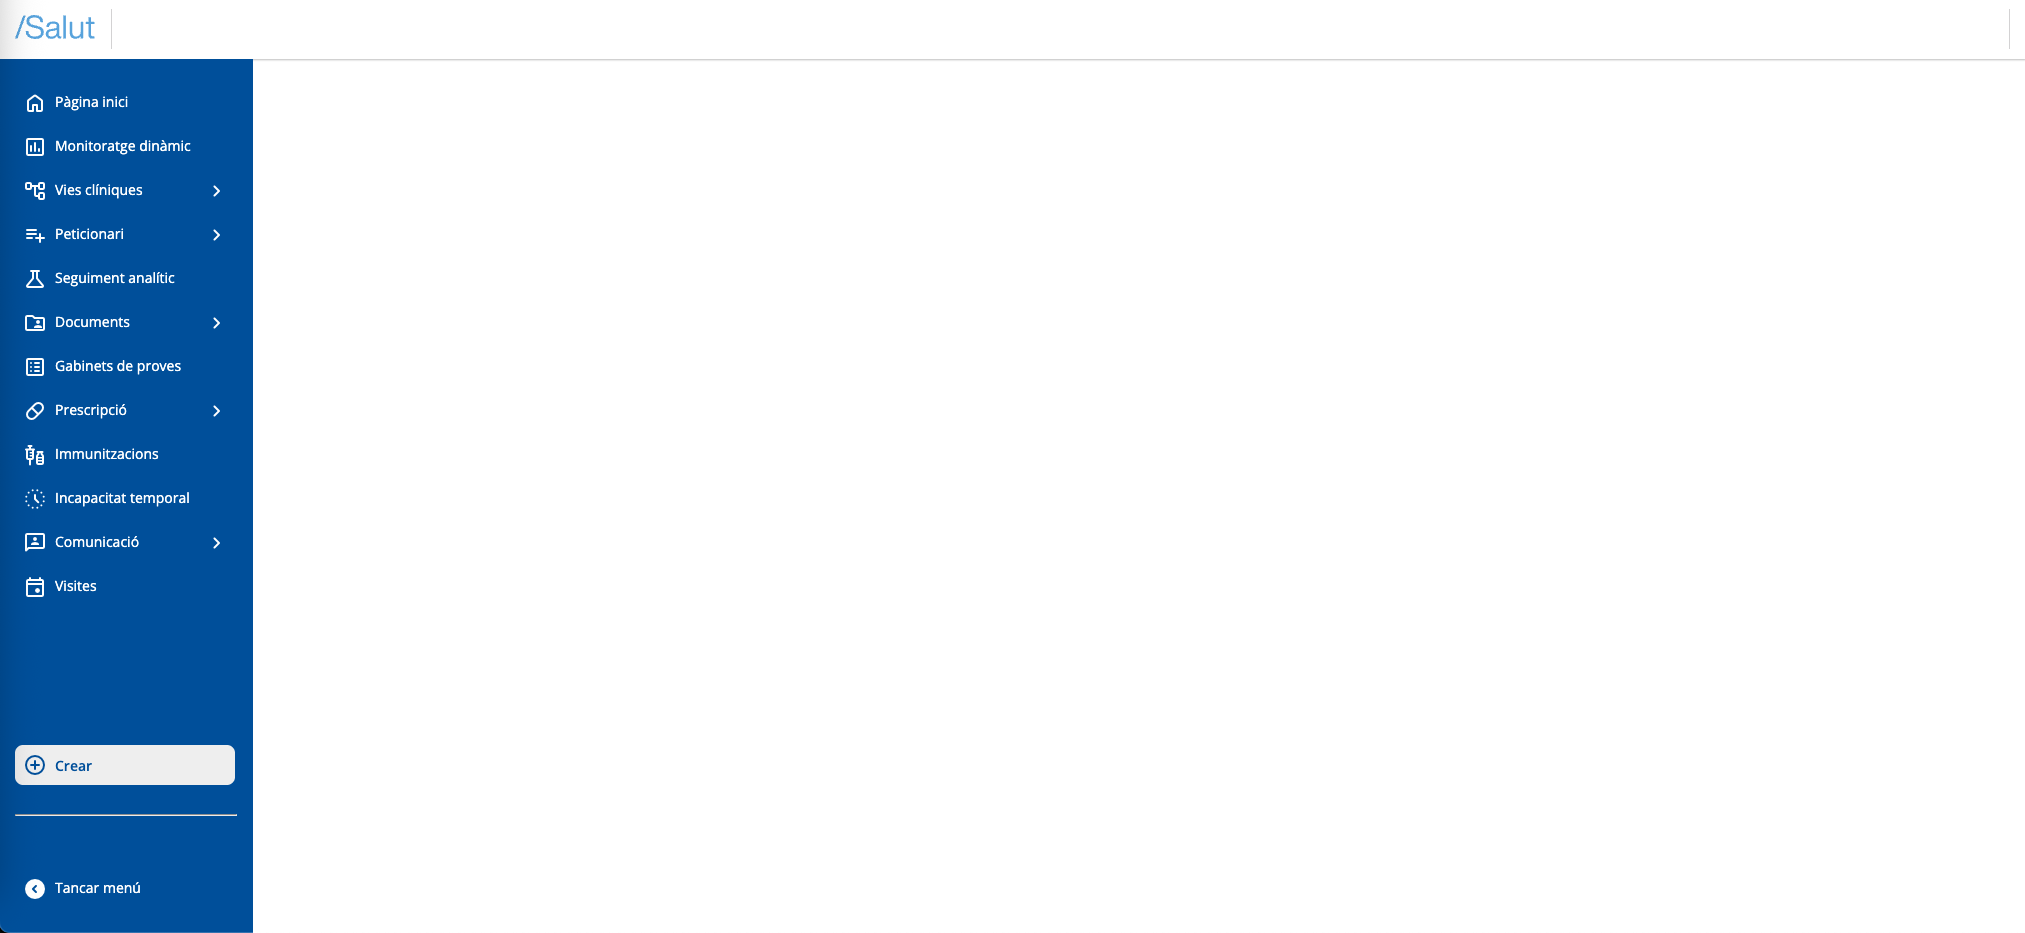
At this point, in the browser we will see the following:
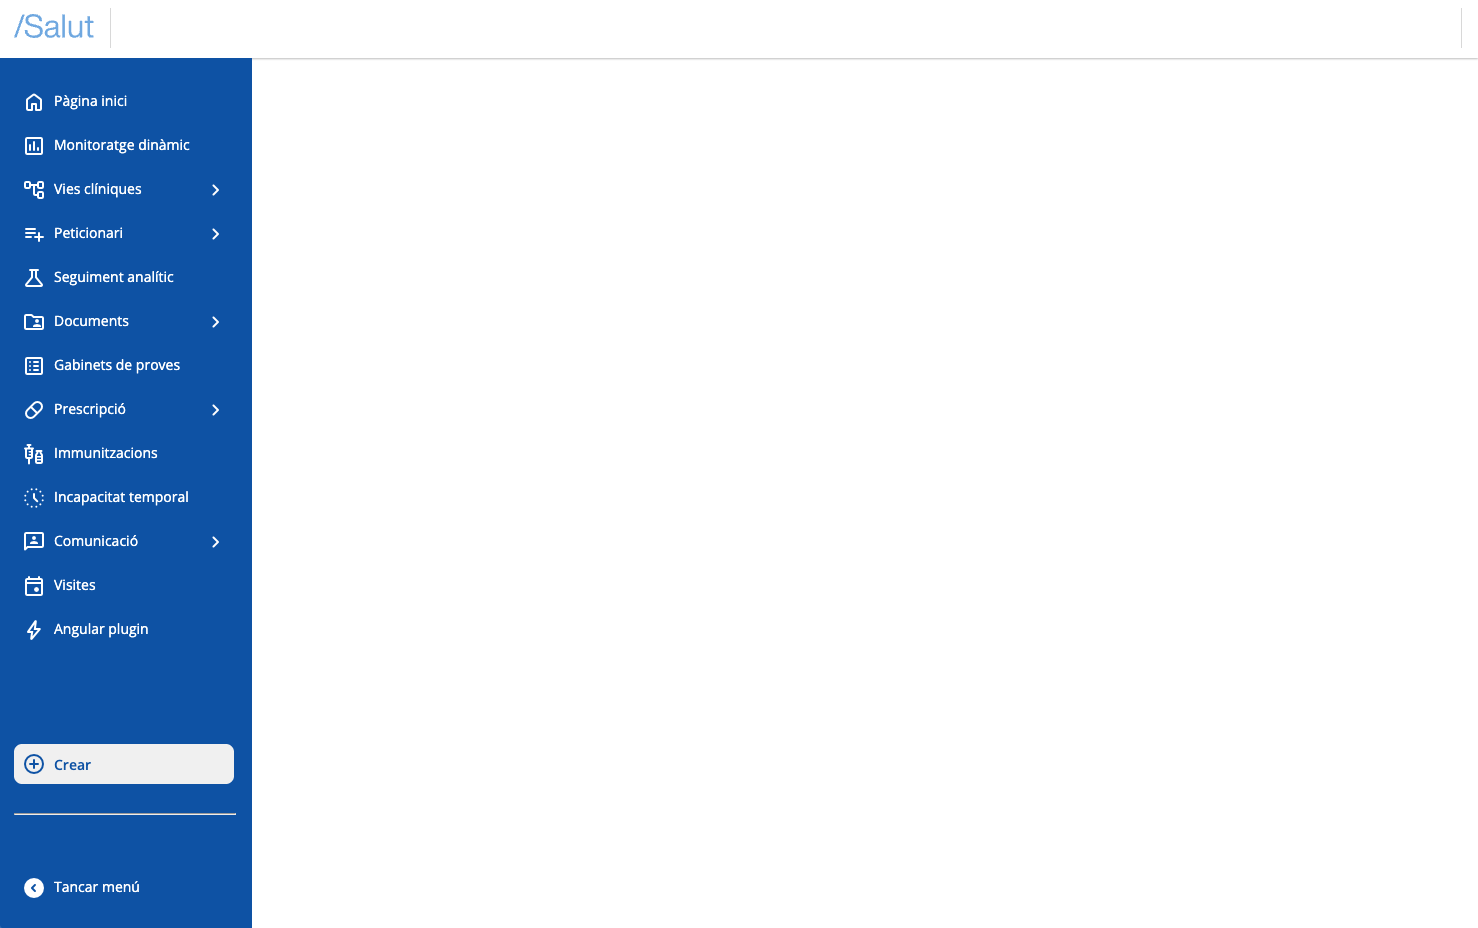
At this point, if integration with any part of the Clinical Follow-up plugin is needed, it will be required to add the compiled plugin file in the Sandbox. To include it, the plugin import must be added to the plugins.ts file. This import can be obtained directly from the demo repository shown at the end.
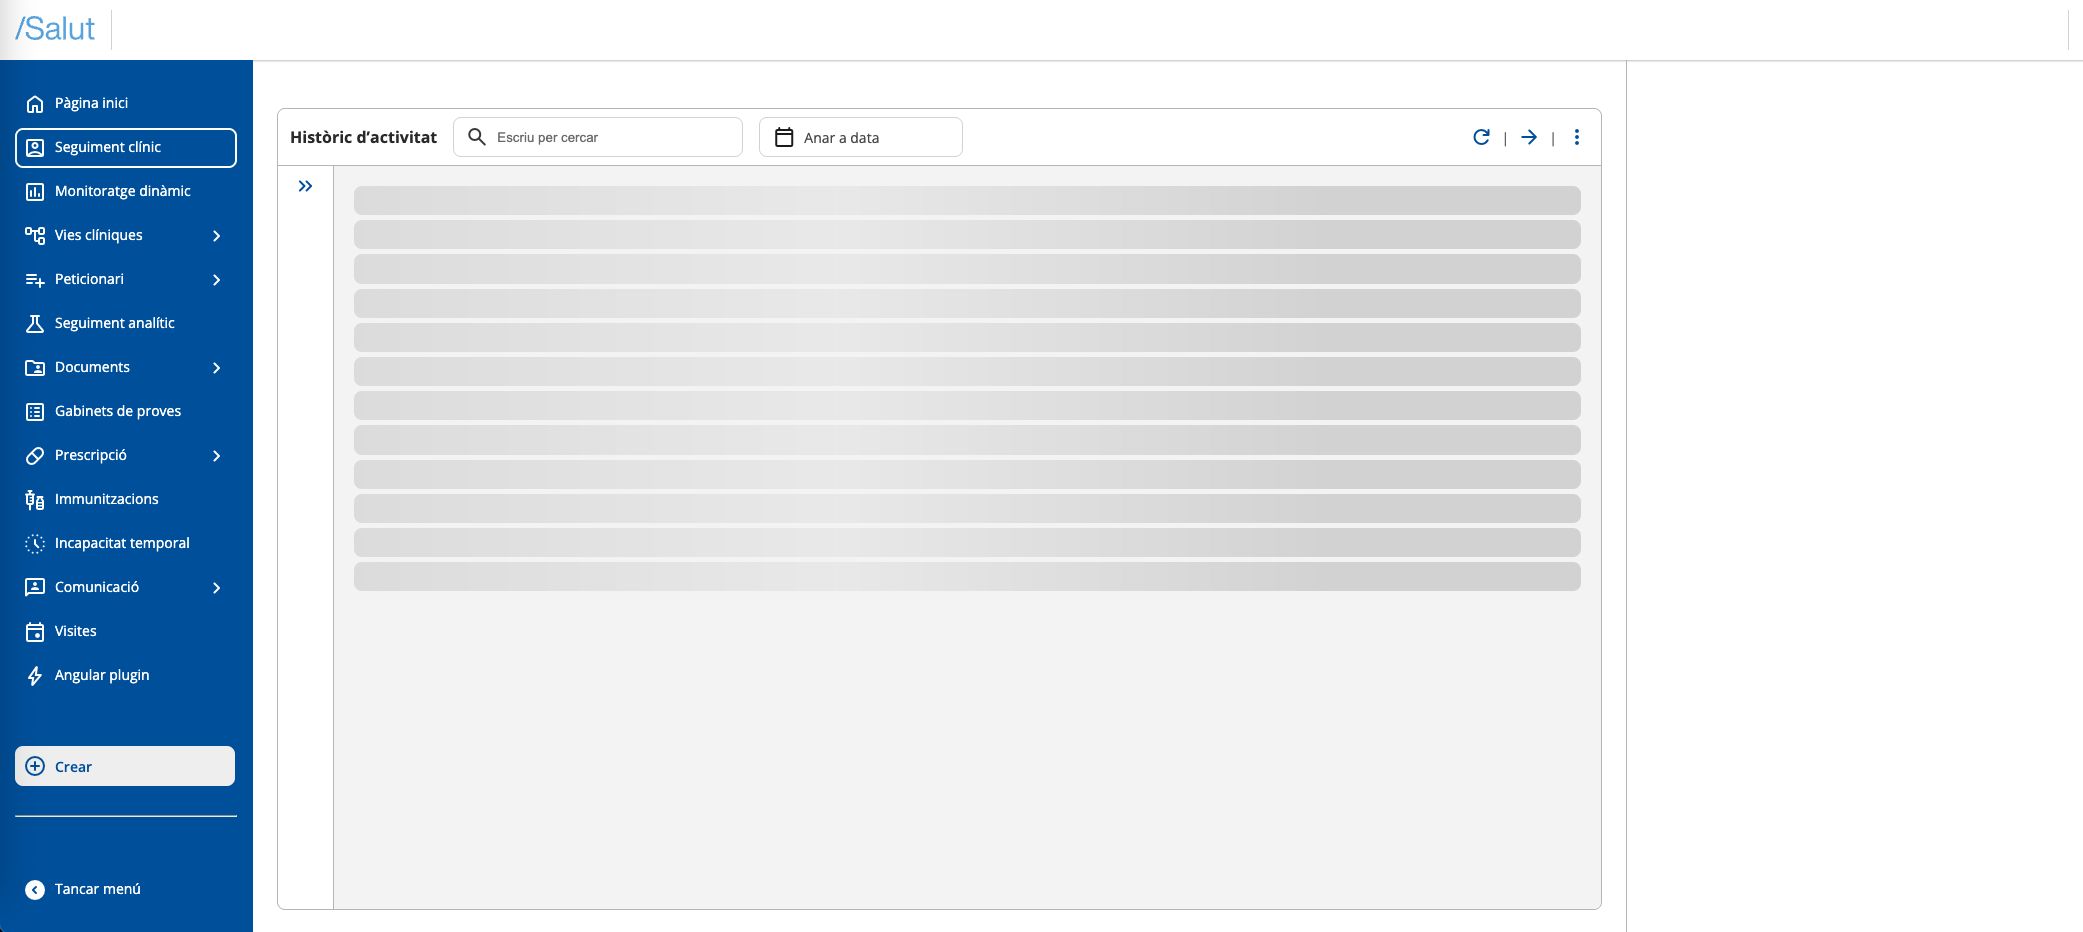
This way, the view that would be displayed if the Clinical Follow-up plugin is incorporated would be the following:
And when clicking the "Angular plugin" button, we will see our plugin working and displayed in the main region:
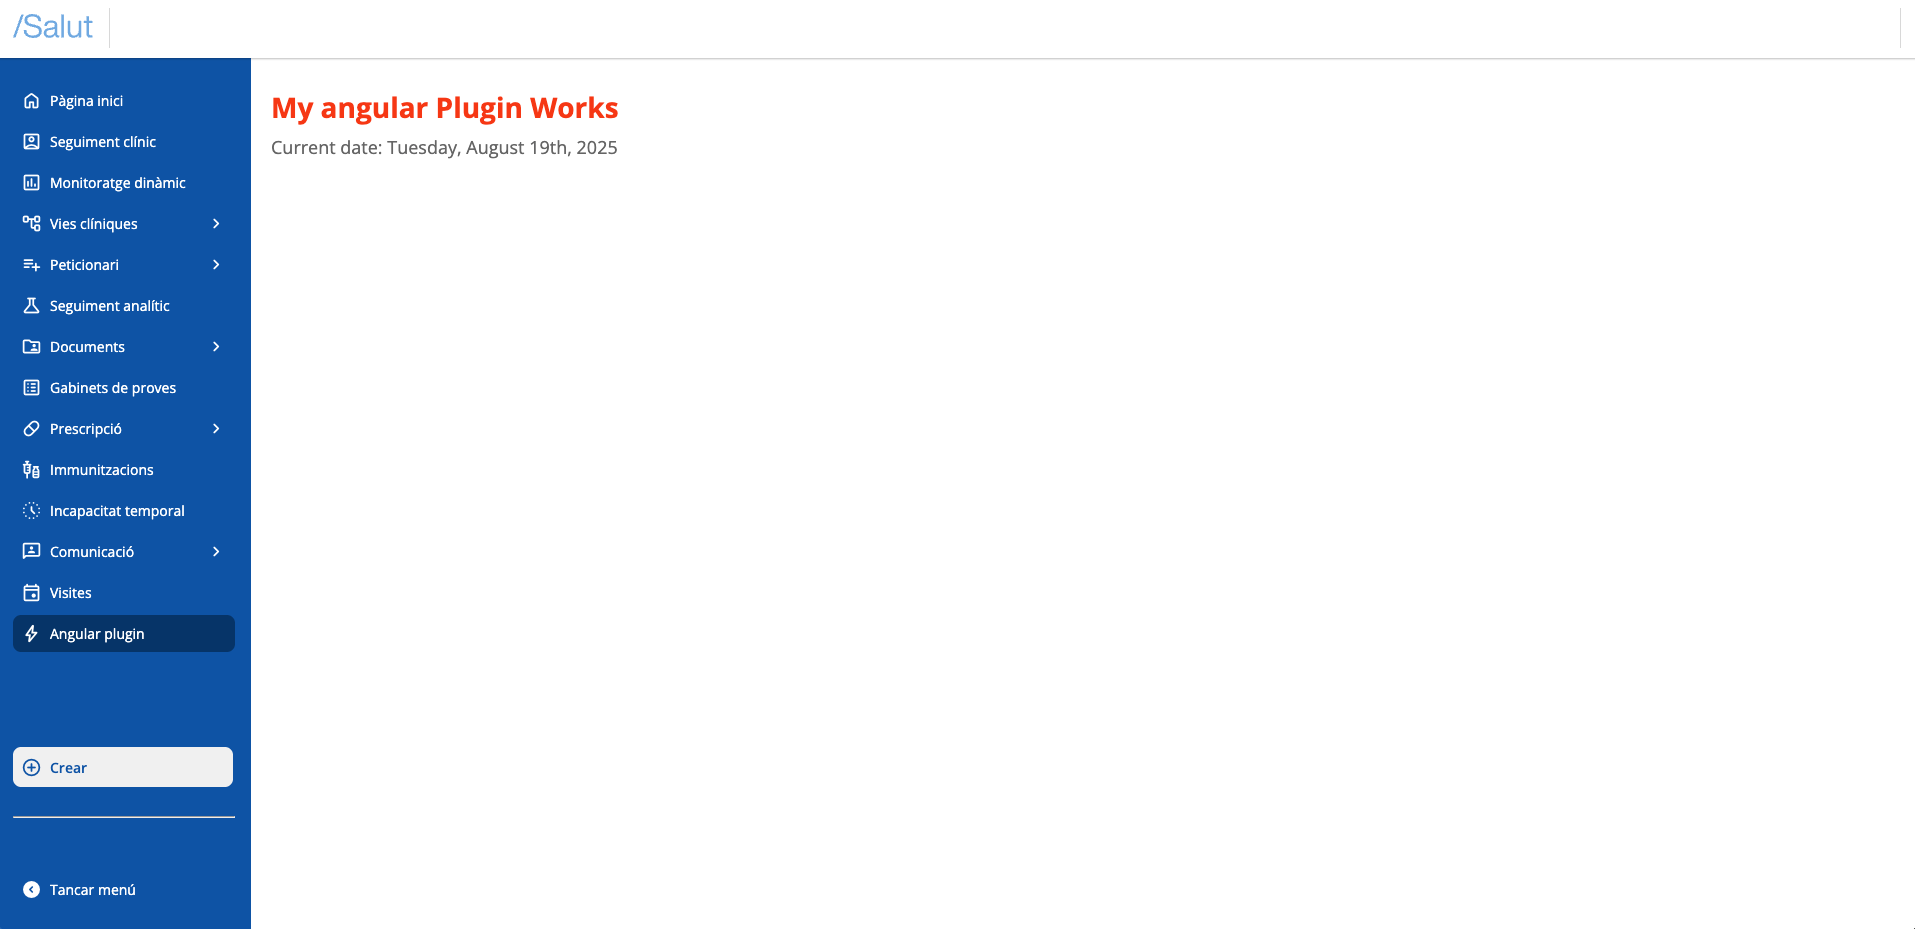
Congratulations, you have implemented your first plugin in Harmonix!
You can see an example repository where a plugin is implemented with Angular:
https://stackblitz.com/~/github.com/uxland/harmonix-angular-plugin-demo